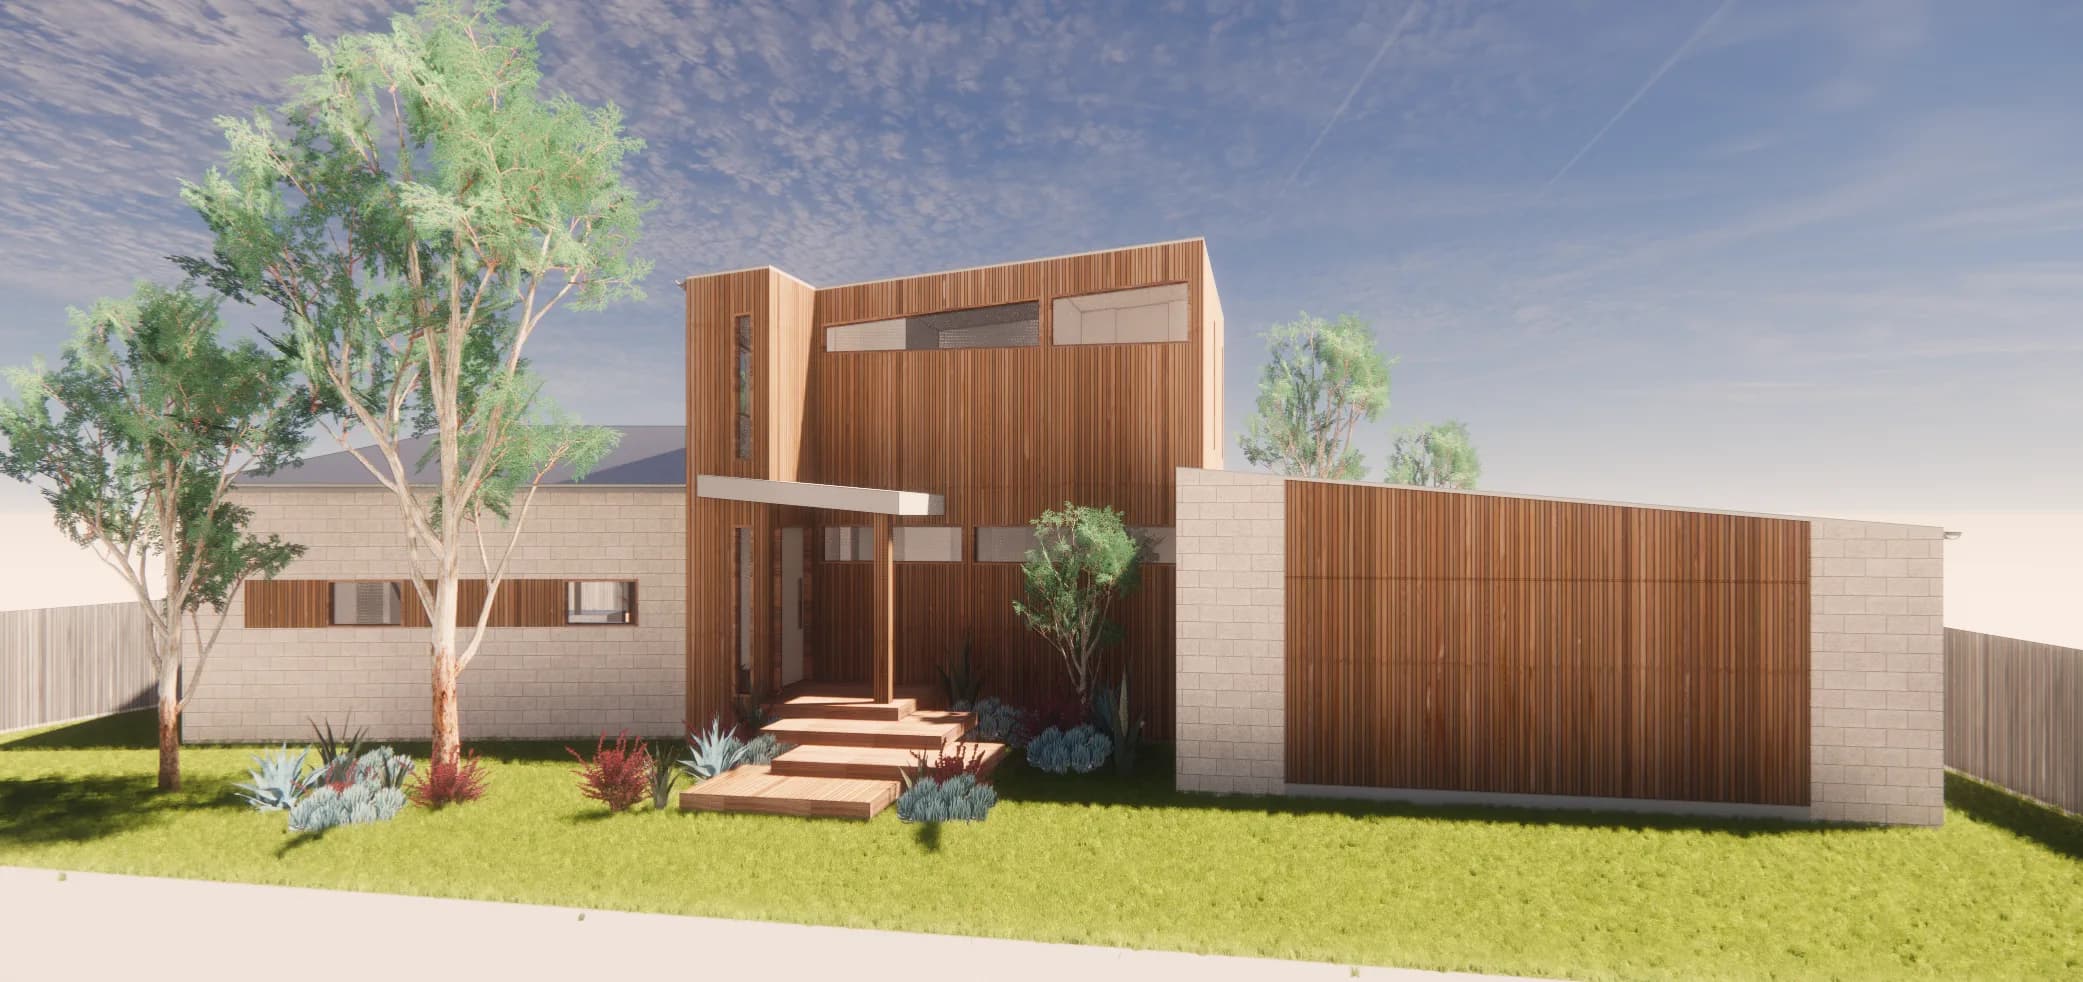

The idea
designPH turns a SketchUp model into a Passivhaus energy model. BPA Tools for designPH adds the reports, checks and shortcuts a Passivhaus designer still ends up doing by hand: window schedules, shading and certifier reports, areas, volumes and thermal bridges, a two-way link with PHPP, design variants, and an evidence pack for the certifier.
It reads the data designPH keeps in your model. It never changes designPH itself, and it only writes PHPP's yellow input cells, after making a backup.
Big models stay quick. Once designPH has analysed a model, it re-checks the whole model on every click and edit - on a large architect's model, SketchUp can take seconds to respond to each one. BPA Tools pauses that watching automatically while you model (and switches it back on whenever it starts designPH's analysis), so selecting, drawing and editing stay instant - and designPH's analysis still runs as normal. A toolbar button switches it by hand. Pair it with Analysis Set, which hides everything without designPH data (furniture, entourage, CAD), and a 100,000-entity model works like a small one.
BPA Tools for designPH is made by Building Physics Australia. It is not made or endorsed by the Passive House Institute; designPH and PHPP are theirs.
What you need
- SketchUp 2025 or later on Windows or Mac (Mac support is new — tell us how it goes), with designPH 2.2 or 3 installed.
- Microsoft Excel for the PHPP tools (PHPP Sync, PHPP Variants, the PHPP Window Study, Import from PHPP). A standard PHPP 10 file (.xlsx, or a macro-enabled .xlsm).
- An internet connection to start the free trial or activate a licence.
On a Mac, macOS asks once for a few permissions — see Setting up on a Mac below.
1. Install it
- Download the .rbz file from this page.
- In SketchUp: Extensions › Extension Manager › Install Extension, pick the file and confirm.
- The BPA Tools for designPH toolbar appears (turn it on under View › Toolbars if it doesn't), and every tool is also in Extensions › BPA Tools for designPH.
To update, install the new .rbz the same way. Your settings and Library are kept.
Had it as "BPA designPH Supplements" (before 0.4.0)? It has a new name, so SketchUp sees it as a different extension: first uninstall the old one (Extensions › Extension Manager, find BPA designPH Supplements, Uninstall), restart SketchUp, then install this one. Your settings and Library come across by themselves; open Licence… and activate your key again. Area and volume allocations made with the old version are not read: allocate them again.
Setting up on a Mac
macOS protects your apps and your screen, so it asks you to allow SketchUp a few things, once each, the first time a tool needs them. All of them live in System Settings › Privacy & Security.
- Control Microsoft Excel (for the PHPP tools). The first time a PHPP tool needs PHPP's results, macOS asks "SketchUp wants access to control Microsoft Excel" — click Allow. If you clicked Don't Allow, switch it on under Automation › SketchUp › Microsoft Excel.
- Accessibility (for capturing designPH's shading diagrams for the Window Report — to find, move and click designPH's window). Open Accessibility, switch SketchUp on (press + and pick SketchUp from Applications if it isn't listed), then press Refresh list in the Window Report window. macOS may also ask to let SketchUp control System Events — click Allow.
- Screen Recording (for the designPH diagram capture — to take its screenshots). Open Screen Recording (called Screen & System Audio Recording in newer macOS), switch SketchUp on, then quit and reopen SketchUp: macOS only applies this one after a restart.
You only need 2 and 3 to capture designPH's shading diagrams. If a permission is missing, the tool says which one and where to switch it on.
How it works on a Mac: the PHPP file is read and written directly, and Excel for Mac is opened only when PHPP has to calculate (Variants, Path to Passivhaus, and once after anything is written, so the saved PHPP always has its results up to date). You may see Excel open and close the file for a moment. Close the PHPP in Excel before a sync. Two things still need Excel on Windows: placing the model picture on PHPP's Verification sheet (paste it in Excel instead), and adding extra rows to a full PHPP table.
To check everything at once, run Extensions › BPA Tools for designPH › Self-test… — it tries each part, and if something misbehaves, send us the report it puts on your Desktop.
2. Start the trial, or activate your licence
Open Licence… from the toolbar or menu.
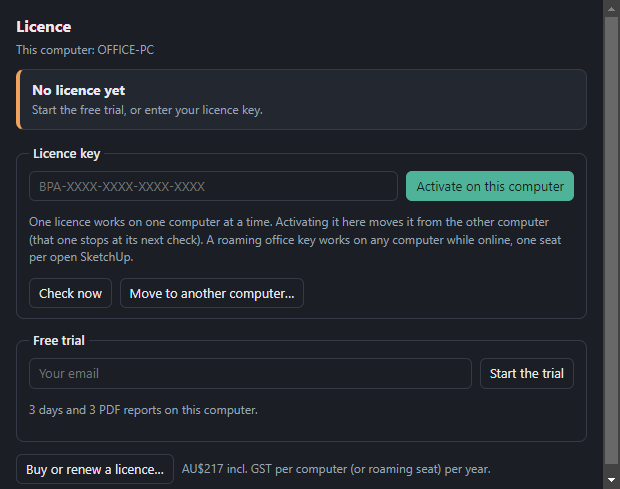
- Free trial: enter your email and press Start the trial — every tool for 3 days, with 3 PDF reports. One trial per computer.
- Licence key: paste the key from your email and press Activate on this computer.
- One-computer licence: works offline for up to 30 days at a time. To move it, press Move to another computer… here, then activate on the other computer (activating there also moves it).
- Roaming office key: one key for every computer in the office, online only. Each open SketchUp holds a seat and frees it when SketchUp closes. When every seat is in use, the tools stay locked and say which computers have them — Check now tries again.
- Key replaced (someone left the office): the window says the key no longer works. Ask for the new key and activate it.
3. Settings — set once, used everywhere
Settings… holds what is yours rather than the project's: it applies to every model on this computer.
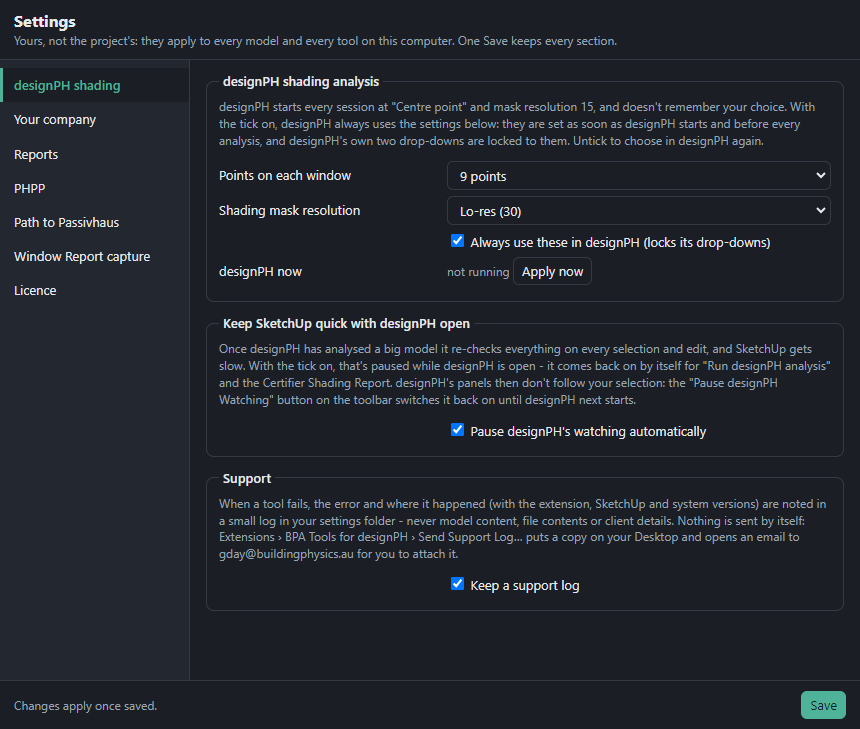
- designPH shading: designPH starts every session at "Centre point" and mask resolution 15. Tick Always use these in designPH to keep it on 9 points and 30 — set when designPH starts and before every analysis, with designPH's own drop-downs locked.
- Your company: your energy consultancy. PHPP Sync puts it on PHPP's Verification sheet for every new project. The client, architect, engineer and certifier belong to each project: type them in PHPP Sync, or pick them from your saved contacts.
- Reports: the folder reports are offered in first, and the Shading Report's defaults.
- PHPP: how many backups to keep beside each PHPP, and the default for converting designPH's .ppp export.
- Path to Passivhaus: the upgrades the optimiser tries first in a new model.
4. Window Schedule
Every designPH window in one sortable table: size, orientation, frame and glazing, U-values, glass fraction, and winter and summer gains.
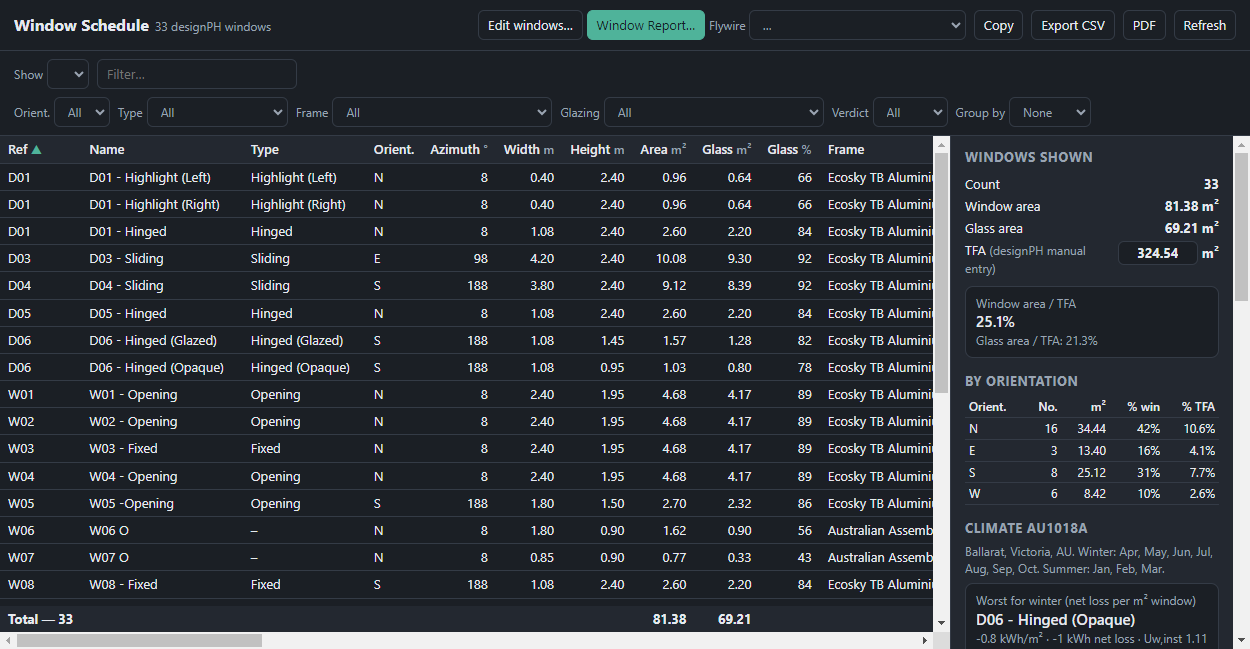
- Filter by orientation, type, frame or glazing, or Group by any of them. Click a row to select the window in the model.
- The side panel gives window and glass area against TFA, a breakdown by orientation, and the best and worst windows for winter and summer.
- Summer, temp. shading: each window's summer solar gain with temporary sun protection, by PHPP's own equation - the summer factor × (0.3 + 0.7·z) for blinds worked by hand, × (0.2 + 0.8·z) automatic. z is 20% by default (Settings).
- Flywire: an insect screen counts as temporary sun protection - reduction factor z 84% with Regulated / transparent ticked (Settings), so it acts in summer only. Choose Flywire › all openable windows (or all, none, or the windows selected in the model); those windows' temporary-shading column uses it, and PHPP Sync writes z and the tick into the PHPP's Shading sheet (AJ and AK). Other windows' temporary sun protection in the PHPP is left as it is.
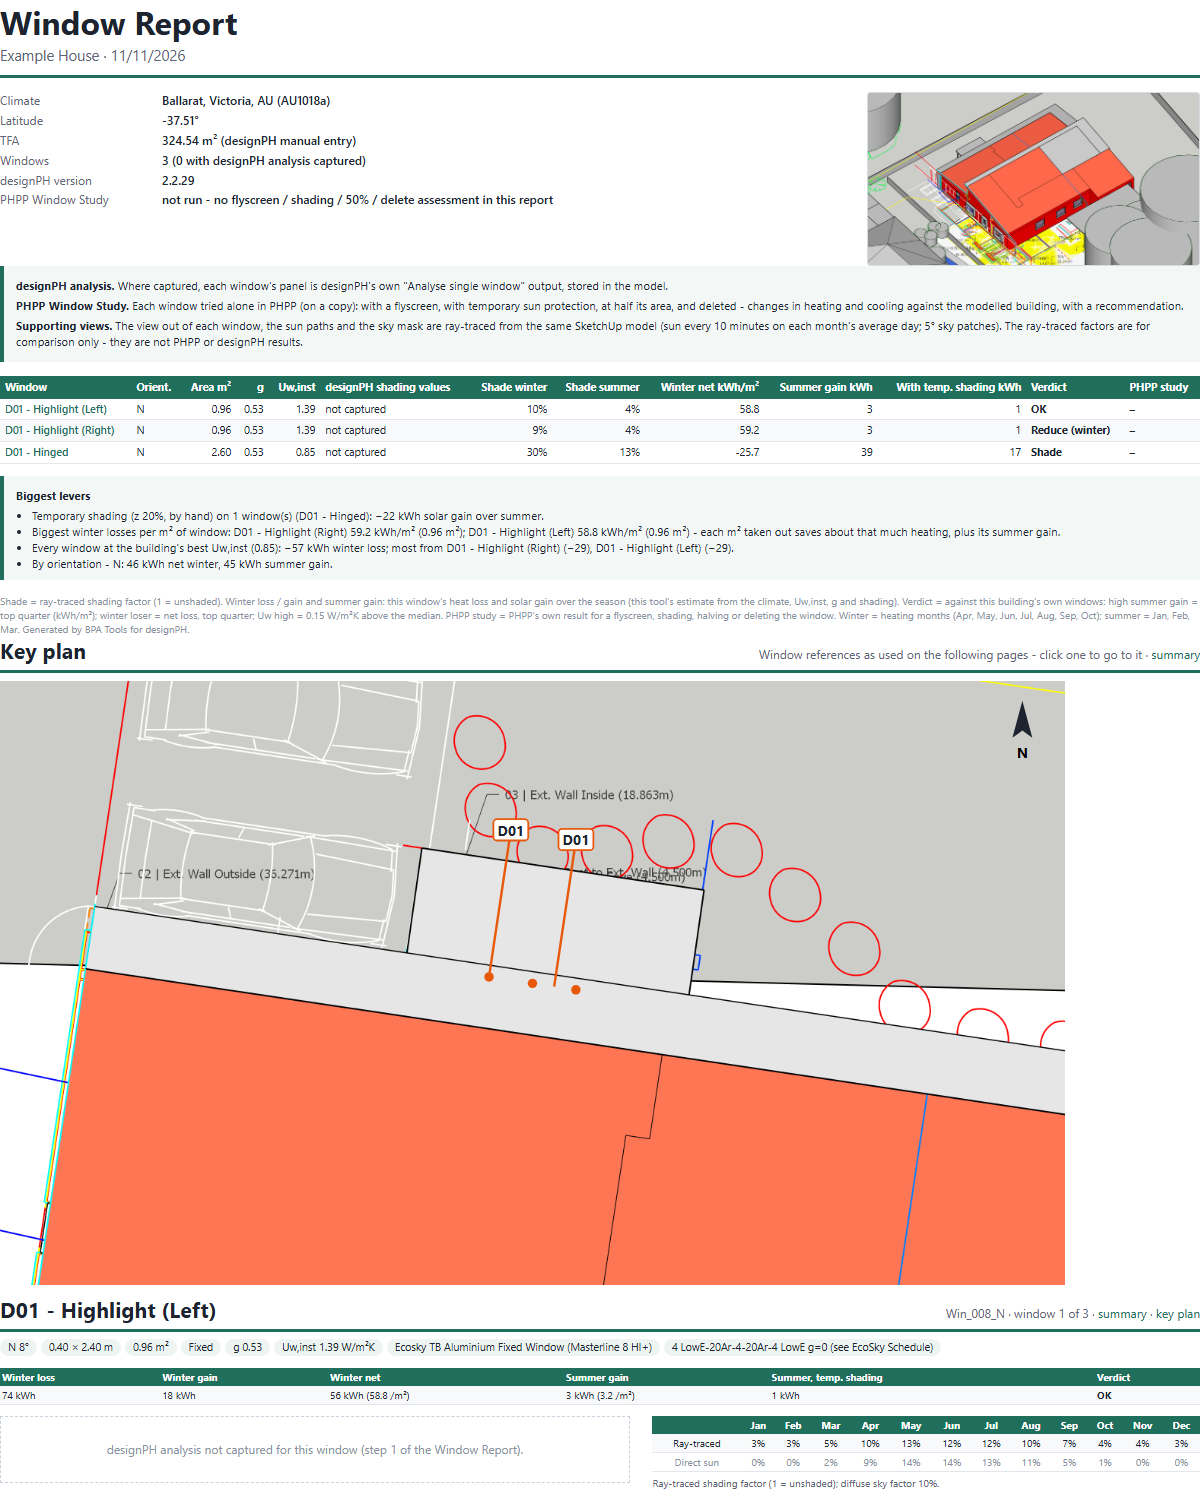
- Verdict for every window, against this building's own windows: OK; Shade (high summer gain but fine in winter - temporary shading keeps the winter gains); Reduce (a net winter loss and high summer gain - usually a big window facing the wrong way); Upgrade (the winter loss comes from its Uw, not its orientation). The thresholds are stated in the report.
- Biggest levers: the few changes that matter most, in kWh and m² of window - shading the windows that overheat, the biggest losses per m², every window at the building's best Uw, what flywire saves in summer, and the totals by orientation. They're in the PDF too. (A quick per-window check; the PHPP has the final word.)
- Copy, Export CSV and PDF save the table as shown. Window Report… opens the Window Report for the windows shown, in the order shown.
5. The Window Report
Model Check (toolbar, before a sync or a report) lists what designPH or the model still lacks - designPH's tables stored, surfaces only guessed into the envelope, default assemblies, assemblies without layers, windows without frame or glazing, without designPH's current shading or changed since their designPH diagram, thermal bridge edges whose type is gone, envelope edges not yet bridges, TFA and Vn50 - each with Select them, which opens the group and selects them (press again for the next group), and a fix where there is one. PDF… saves it as one page.
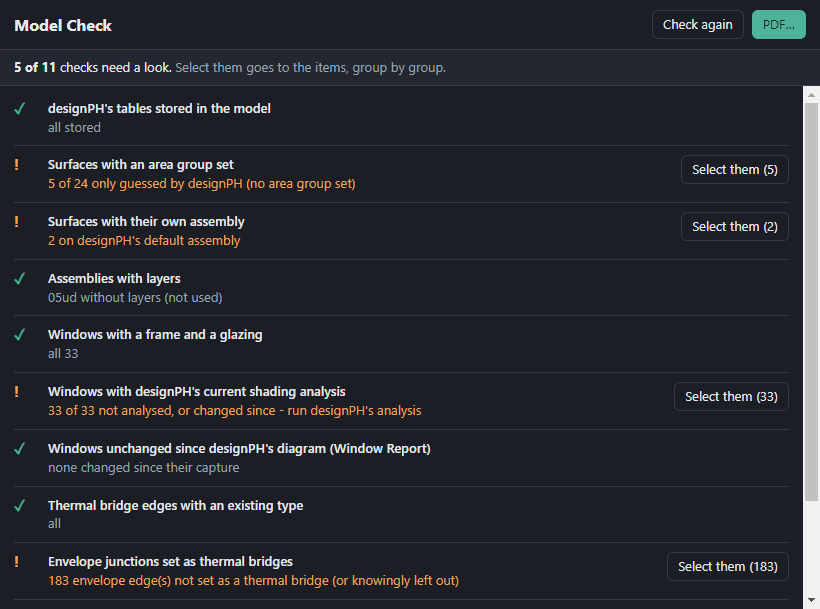
No new analysis for a report. designPH keeps its results only while it runs. BPA Tools keeps designPH's window shading on the windows each time you save with designPH open (Settings › Reports), and designPH's diagrams with their marked parts - so next session the reports have them from the .skp alone, dated.
Report revision (Extensions › BPA Tools for designPH › Report Revision…): a letter, date and note that every PDF of this model carries, and the Window Report and Evidence covers show.
Every PDF carries page X of Y, the model's and the PDF's file and folder, and the version and time it was made, in its footer. Its contents and summaries are links (click a window, a section or a location page to go there), and the PDF has a bookmark panel.
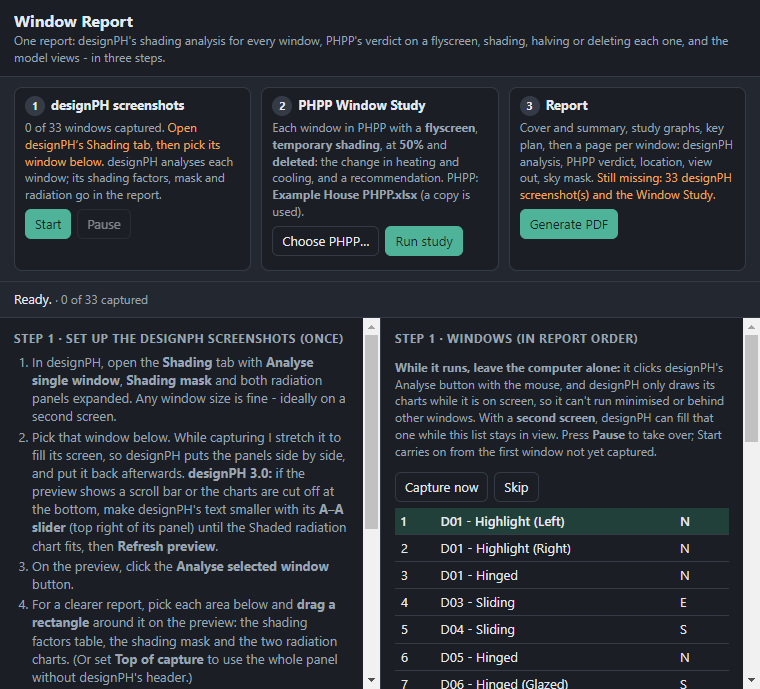
Window Report (toolbar, or Window Report… in the Window Schedule) opens one window that builds the report in three steps, each with a tick and a status line:
- designPH screenshots - designPH's shading analysis for every window (below).
- PHPP Window Study - Choose PHPP… (the one PHPP Sync uses, unless you pick another), then Run study.
- Generate PDF - it says what's still missing and asks before making an incomplete report.
The PDF (A4 landscape) has a cover with the climate, TFA, designPH version and method; a table of every window - g, Uw,inst, shading, winter net loss, summer gain with and without temporary shading, the schedule's verdict and PHPP's recommendation; the biggest levers; the study's graphs; a key plan; and a page per window: openable or fixed, its energy balance and verdict, designPH's panels, the PHPP table, where it is in the model, the view out with sun paths, and the sky mask (real shading traced from the model).
PHPP Window Study (step 2 of the Window Report, or Window study in PHPP Variants): PHPP itself tries each window four ways, each alone - a flyscreen (temporary sun protection z 84%, openable windows only; fixed windows are marked Fixed), temporary shading z 20%, the window at 50% of its area and deleted - on a copy of the PHPP (sync first; your PHPP is not changed). A window is openable when its name or type says so (hinged, sliding, door, awning…), and fixed when it says "fixed". It reports heating and cooling demand (kWh/m²a), heating and cooling load (W/m²) and overheating against the modelled building, as kWh/m²a and %, with graphs of the most effective changes for winter and summer and a recommendation per window: Delete / rethink (leaving it out lowers heating and summer), Reduce (half the area lowers both), Flyscreen or Shade (the screen or the shading cuts summer by 1% or more, at no winter cost) or Keep. The results are kept in the model: they show as columns and graphs in the Window Schedule and in the Window Report. "At 50%" halves the window's area with the same frame share; a real smaller window has a little more frame. Windows only for now (Excel on Windows).
designPH's shading diagrams (step 1 of the Window Report) steps through the windows with designPH open, clicks designPH's Analyse selected window for each and captures its shading factors, mask and radiation charts. Each capture is kept in the model, on its window, for the Window Report.
- Open designPH's Shading tab first (Analyse single window, Shading mask and both radiation panels expanded), then pick its window in the capture window and click its Analyse button once on the preview.
- While it runs, leave the computer alone. It clicks with the real mouse, and designPH only draws its charts while it is on screen, so it cannot run minimised or behind other windows. A second screen is ideal: designPH fills one, and you can watch the list on the other. Pause stops it.
6. Areas and volumes
- Select groups (rooms, storeys) or faces and use Allocate to Set… to put them in a named volume or area set — "Ground floor", "Treated floor area", "Garage". With groups and surfaces both selected it asks which you mean. A group that only holds other groups (a storey of rooms, say) adds each of those groups to the volume set separately, however deep they sit.
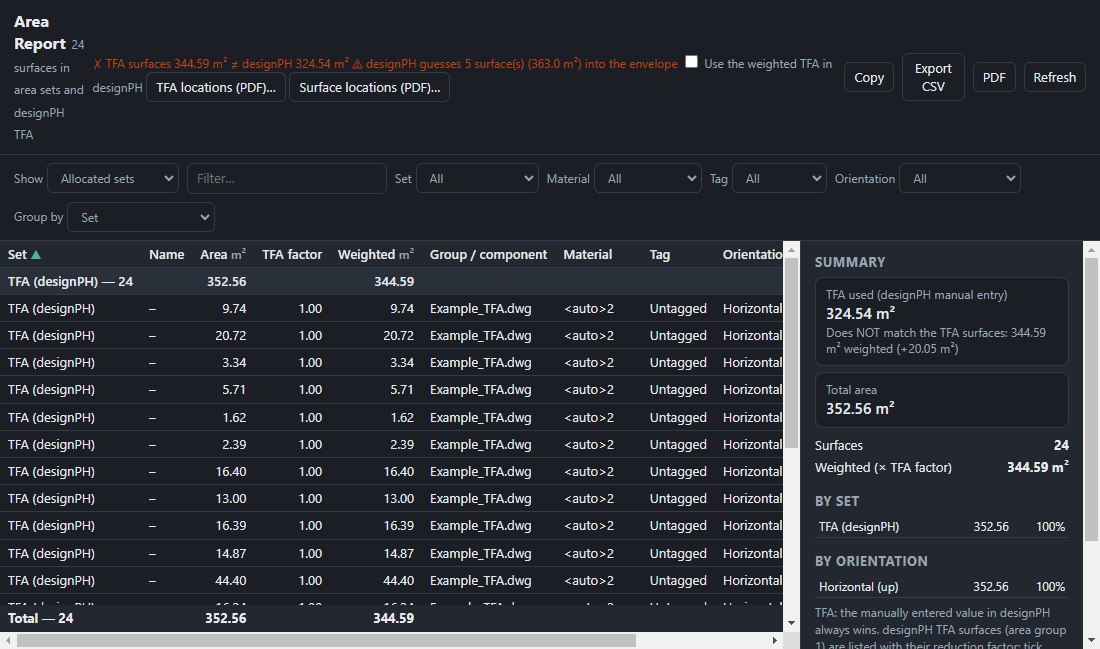
- Area Report and Volume Report list every set with its parts and totals; with something selected, they report just the selection.
- Labels in Model shows (or removes) a label on every allocated surface, volume and thermal bridge.
TFA check. The Area Report says whether designPH's TFA entry matches its TFA surfaces (area group 1, each times its reduction factor). If it doesn't, tick Use the weighted TFA in designPH: the weighted total becomes designPH's own TFA entry, so designPH, its export and PHPP Sync all agree, and it follows the model as you change it. Untick to put designPH's entry back.
Your own "TFA" area set (Allocate to Set) is only this plugin's - designPH, and so PHPP Sync, count area group 1. If surfaces are in the set but not designPH's TFA, the Area Report offers Make my TFA set designPH's TFA. It also warns when designPH is guessing surfaces into the thermal envelope that nobody allocated (shading, site, neighbours): set them Non-thermal (see Cleaning up a model).
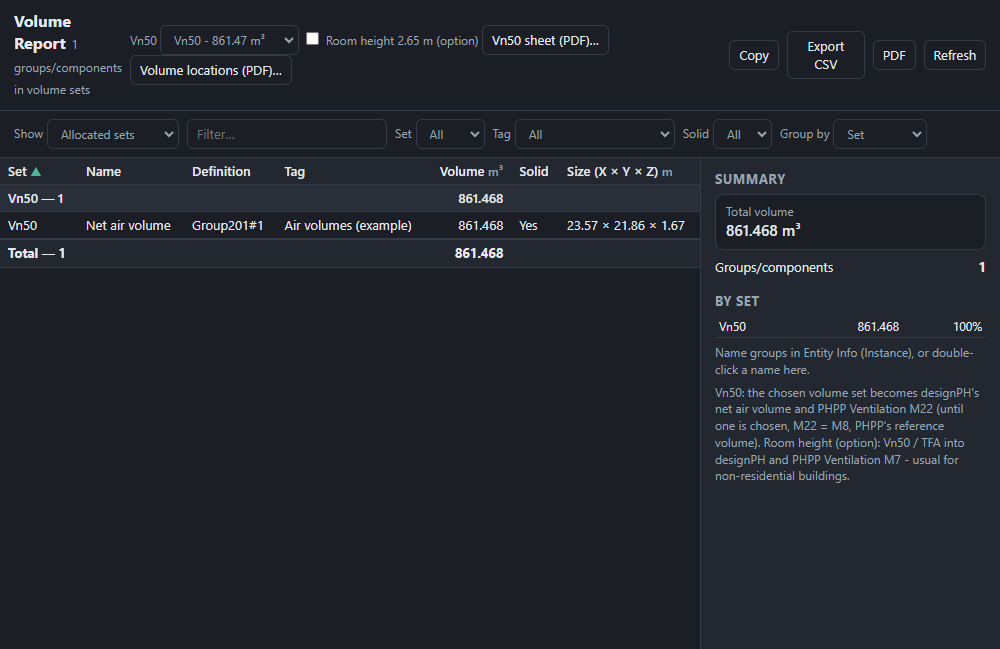
Net air volume Vn50. Put the internal air volumes (the rooms, inside the envelope) in one volume set, then in the Volume Report choose it under Vn50. Its total becomes designPH's net air volume and PHPP's Ventilation M22, and follows the model. Until a set is chosen, M22 uses PHPP's reference volume (M8). Vn50 sheet (PDF) makes one page for the airtightness tester: each volume, the total and the air flow at 50 Pa for the design n50.
Room height (option). With a Vn50 set chosen, tick Room height to use Vn50 ÷ TFA as designPH's room height and PHPP's Ventilation M7 — usual for non-residential buildings; residential ones normally keep PHPP's 2.5 m.
designPH reads these when it is re-initialised: the plugin does that for you when designPH is open (then run its analysis again).
7. Thermal bridges
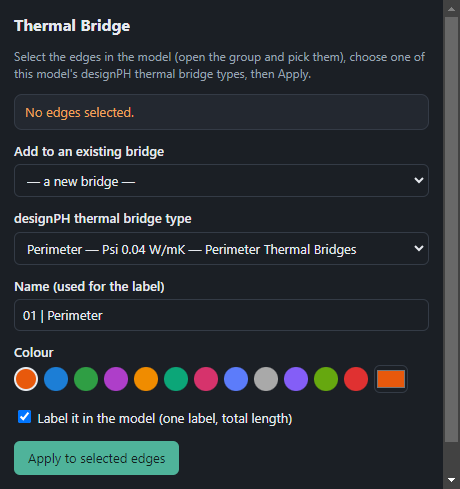
Thermal Bridge… turns the edges you select into a designPH thermal bridge of one of the model's own types, with a name and a colour, and one label showing its total length.
Thermal Bridge Report lists every bridge with its type, area group, length and Ψ × L, and the totals by area group.
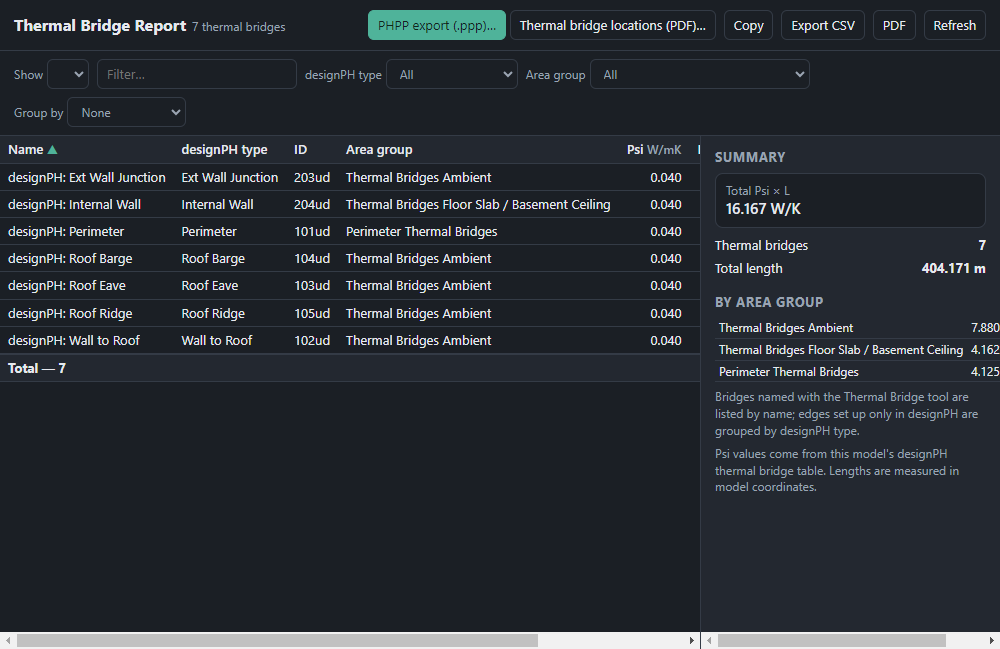
PHPP export (.ppp)… converts designPH's .ppp export so PHPP gets your named thermal bridges on top, designPH's own rows moved below (or left out), and a sum check — for all five export profiles.
8. designPH Areas — edit surfaces in a table
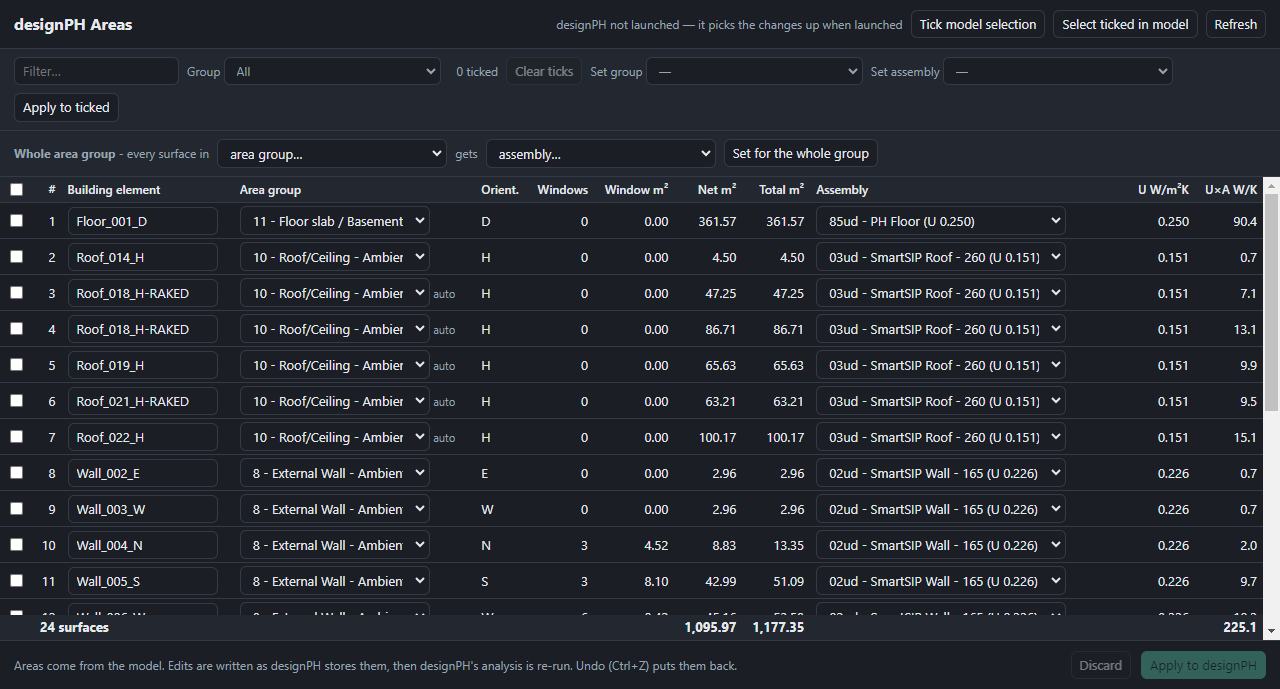
designPH Areas… lists every surface designPH will send to PHPP. Change names, area groups and assemblies for many surfaces at once instead of one at a time in designPH.
designPH Windows… does the same for windows: every window in a table with its frame, glazing, the four installation sides (left, right, head, sill), width, height and name. Change one in place, or tick windows (filter first, e.g. "north") and Set for ticked a frame, glazing or installation side. Nothing is written until Apply changes - one undo step. It sets exactly what designPH's own window panel sets, so designPH's analysis and PHPP export follow. Also Edit windows… in the Window Schedule.
Cleaning up a model
Three tools for tidying geometry before (or instead of) fixing it in designPH. Each one tells you what it will change and asks first, and Ctrl+Z undoes it in one step.
- Strip to Lines: open a group (double-click it), then press it. Every designPH window and every surface in that group goes and the lines stay, ready to rebuild from. Groups inside it are left alone.
- Strip designPH Properties: takes designPH's area groups, assemblies, names, temperature zones and thermal bridges off the surfaces, lines and groups you've selected (or the open group, or the whole model if nothing is selected or open). designPH windows keep theirs. designPH then works everything out again as if it had never seen it.
- Unallocated Surfaces to Non-thermal: any surface nobody has given an area group (designPH has only guessed, or hasn't seen it yet) becomes Non-thermal. Use it on stray geometry — a site, a fence, a neighbour, an eave — that designPH would otherwise count as part of the thermal envelope. Works on the selection, the open group or the whole model, the same way; surfaces you've already allocated aren't touched. If designPH is currently guessing any of them into the envelope, it says how many first — real envelope surfaces designPH found by itself are unallocated too, so give those an area group before running it on the whole model.
- Surfaces to Groups…: the selected surfaces (or every surface in the open group) become one group each. Give a height and each becomes a solid volume — floors pushed up by that height — ready for a volume set (the Vn50 set, say), which you can name in the same box. The volumes are Non-thermal and carry no TFA, and your surfaces stay where they are. Leave the height blank and each surface simply moves into its own group, keeping its designPH properties. Either way it checks the TFA before and after: if the TFA would change, nothing is done and it tells you.
A big model: keeping designPH quick
designPH analyses everything visible in the model ("The analysis set contains 18333 entities…"), and once it has analysed a big model it checks again on every selection and edit, so SketchUp gets slow.
- Analysis Set… lists everything with no designPH data — imported CAD, labels and dimensions, guides, entourage — largest first, with how many items each holds, and what's visible now against what would be left. Hide ticked hides them (one undo step); Show what this hid brings back exactly those, never anything you hid yourself. Shading objects you've set to Non-thermal are designPH data, so they're never listed — but anything listed that does shade a window (a neighbour, a fence, the site) should be ticked Keep visible: designPH can't see hidden geometry. That choice is remembered in the model.
- designPH's watching is paused automatically while designPH is open (Settings › "Keep SketchUp quick with designPH open", on by default): it comes back on by itself for Run designPH analysis and while the designPH diagram capture steps through windows, and pauses again after. designPH's panels don't follow your selection meanwhile - the Pause designPH Watching button on the toolbar switches it back on until designPH next starts.
9. Your Library
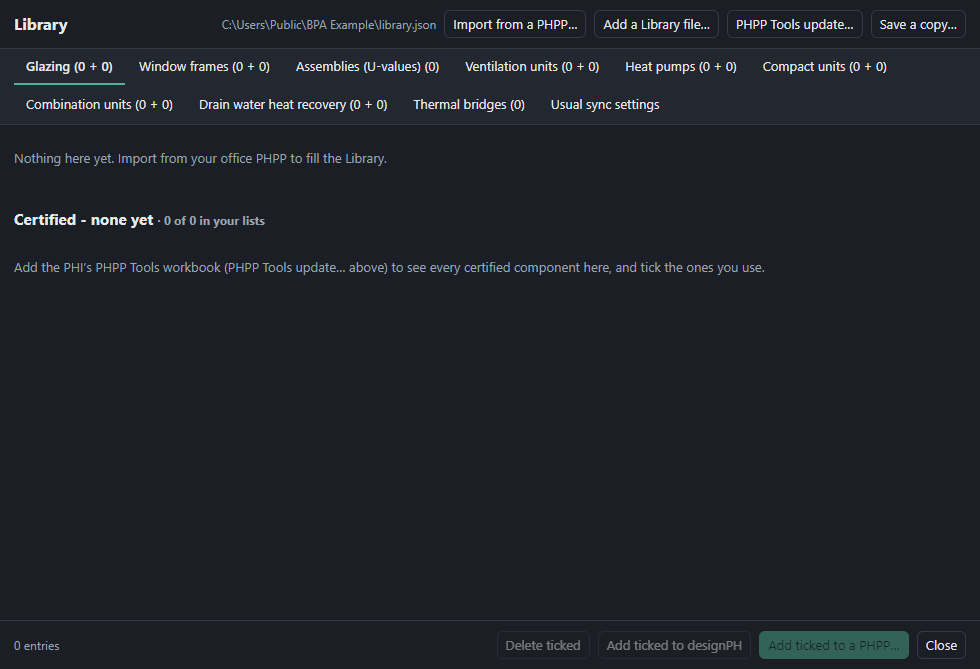
Library… keeps your own glazing, frames, assemblies, ventilation units, heat pumps, compact units, combination units, drain water heat recovery and thermal bridge types in one place on this computer. Import them from an office PHPP once, then add them to designPH or to any PHPP.
- Certified components: add the PHI's PHPP Tools workbook (PHPP Tools update…, e.g. PHPP_EN_V10.6_Tools_update260710.xlsm - and later ones as the PHI publishes them). Each tab then lists every certified component under your own, grouped as the PHI groups them (by climate), with a search box. Tick the ones you use - or tick all in a group.
- Your lists: everywhere the plugin asks you to pick a component (ventilation unit, heat pump in PHPP Sync), the list is your own components plus the certified ones you ticked. Choose one of your own and PHPP Sync puts it into a free user row of the PHPP first.
- Ventilation units and designPH: designPH can't hold your own units - it stores only the chosen unit, from its certified list. So each unit gets a designPH match: the same certificate where designPH has it, otherwise the nearest by heat recovery, electricity use and airflow range. PHPP Sync writes the real unit into the PHPP and the match into designPH, and says which.
- Heat pumps, compact and combination units, drain water heat recovery go into the PHPP only - designPH doesn't model heat generation.
- Thermal bridges: the Library keeps your junction types with their Ψ values (from your office PHPP's Areas sheet). Add ticked to designPH puts them into this model's thermal bridge types: a type with the same name gets the Library's Ψ (an override — every edge of that type follows it), and a new name gets a new row, ready for the Thermal Bridge tool. Up to 100 types per model, a standard PHPP's thermal bridge rows.
Import from PHPP… copies a PHPP's user-defined glazing, frames and assemblies, and its thermal bridge types with their Ψ values, into designPH, with a full preview first and a one-click restore. Thermal bridges match by name: one designPH already has takes the PHPP's Ψ, and a new one is added. The same window lists your company Library too: tick any of its glazing, frames, assemblies or thermal bridges to bring them in with the same import (one Undo, one Restore).
10. PHPP Sync — designPH straight into PHPP
PHPP Sync… writes designPH's areas, windows, shading and thermal bridges straight into a standard PHPP — no export file — together with the inputs a standard PHPP still needs.
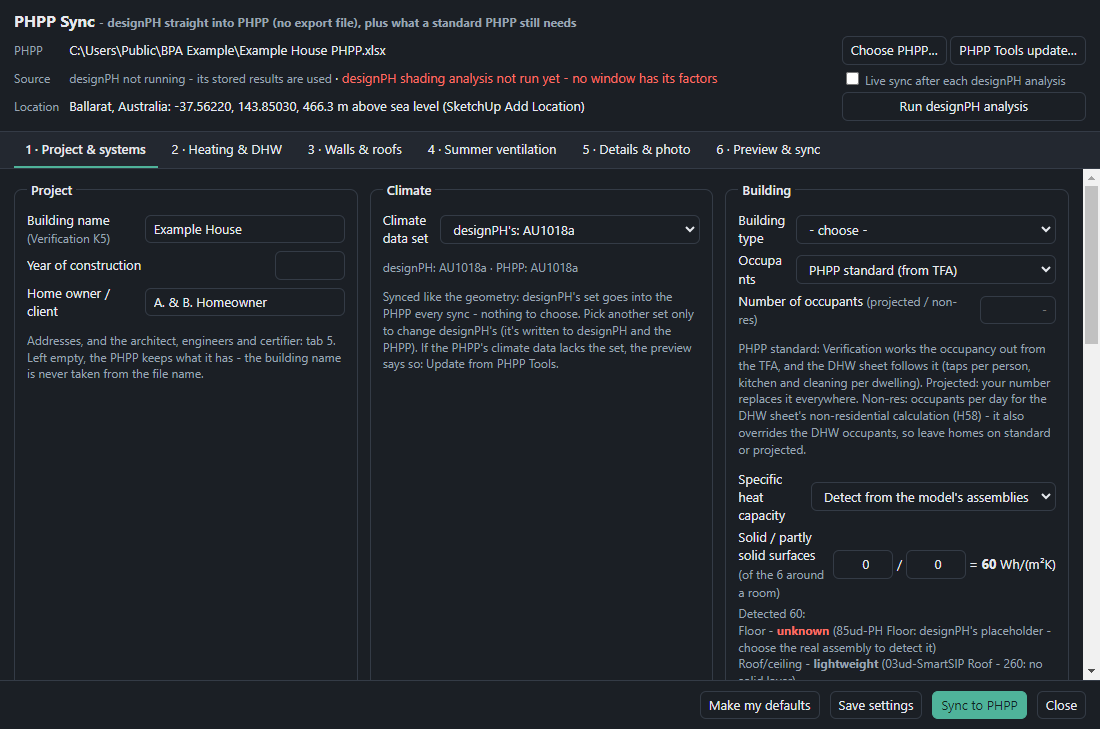
- Choose PHPP… (a standard PHPP 10).
- Work through the tabs: Project & systems (climate, building type, occupants, heat capacity — detected from your assemblies — ventilation and heat generators), Walls & roofs, Summer ventilation, Details & photo (the parties on the Verification sheet, the model picture), then Preview & sync to see exactly what changes before Sync to PHPP.
- Tick Sync to keep the PHPP up to date as you work.
Who wins. designPH decides the geometry: areas, windows (and which assembly, glazing and frame each one uses), shading factors, thermal bridges, the ground slab and room height — written on every sync. The PHPP decides everything else: climate and location, ventilation, airtightness, occupants, systems, the parties, and the values of components it already has (Ug, Uf, layers). The first sync into a PHPP writes your settings (they start from what that PHPP already has, and replace a new PHPP's template defaults). After that, a change you make in the sync settings still goes through — but anything you change in the PHPP itself stays, and the preview lists it. Clear the cell in the PHPP to let the sync fill it again. If designPH needs a different component in a library row the PHPP already uses, the preview asks which to keep.
Every sync backs the PHPP up first (into a "PHPP backups" folder beside it) and writes only yellow input cells. Make my defaults keeps this model's settings for new models.
Climate data and certified components. A PHPP carries the climate data and certified components of its release. PHPP Tools update… (next to Choose PHPP…) brings them up to date - with the newest PHPP Tools in your Library, or a Tools workbook you choose there (it's added to the Library too) - exactly what the PHI's own Tools macro does, backup first. The Preview offers it too when the PHPP is older.
The climate syncs like the geometry. designPH's climate set goes into the PHPP every sync, with the model's location and country - nothing to choose. Pick another set in tab 1 only to change designPH's. If the PHPP's climate data lacks the set (AU1002b Perth isn't in an older PHPP), the sync says so - run PHPP Tools update… - rather than leaving PHPP's default climate in place.
Still needed. The Preview starts with what a standard PHPP still needs and nothing has set yet - TFA, building type, heat generators (adding up to 100%, and a real heat pump rather than PHPP's placeholder), the ventilation unit, frost protection's limit temperature, geo-location, a climate set the PHPP lacks - each with where to set it. Fill those and a default PHPP comes out of the sync without errors.
On tab 1 too:
- Project: the building's name (Verification K5 - never the file name), year of construction and the home owner. Addresses are on tab 5.
- Ventilation unit from your list (see Library), with designPH's match shown; frost protection (1-None, 2-Electr., 3-Hydraul.) and, for 2 and 3, its limit temperature from the unit's data sheet.
- Mechanical cooling: Verification's tick, and the Cooling units sheet - supply air cooling, recirculation cooling (split units), additional dehumidification, panel cooling - each with the number of units and the unit: your Library's first (combination units for list 1, heat pumps for list 2 - one of your own goes into a PHPP user row), then all of the chosen list in the PHPP. Operating time left blank is 24 h × 7 days, as certification assumes.
- Heating & DHW (tab 2): the DHW+Distribution sheet - heat delivery (tick any of PHPP's seven kinds; the heat pump's delivery follows), flow temperature, heating pipes (hydronic systems only), DHW circulation (inside or outside the envelope, or none), individual pipes, litres per person, DHW tanks and a buffer, drain water heat recovery and cooling pipes. Tapping points and pipe length come from the extract rooms on tab 1: hot taps per room (kitchen 1, bathroom 3, shower room 1, WC 1, laundry 2 - change them under Hot water taps per room) × 10 m of pipe per tap; type your own numbers to override. Defaults are the SSA template's (pipes 19 mm with 12 mm reflective insulation, λ 0.04; a 315 L DHW-only tank outside, 2.5 W/K). Pipe mountings are always written as one of PHPP's choices (the templates' "None" counts as Bad). A model synced before 0.5.1 starts with this tab off, so the PHPP keeps its own DHW sheet until you tick it.
- Heat pump from your list first, then everything in the PHPP.
A setting that has never been synced into this PHPP goes in like a first sync; after that, anything changed in the PHPP itself stays (see Who wins).
11. PHPP Variants and the Path to Passivhaus
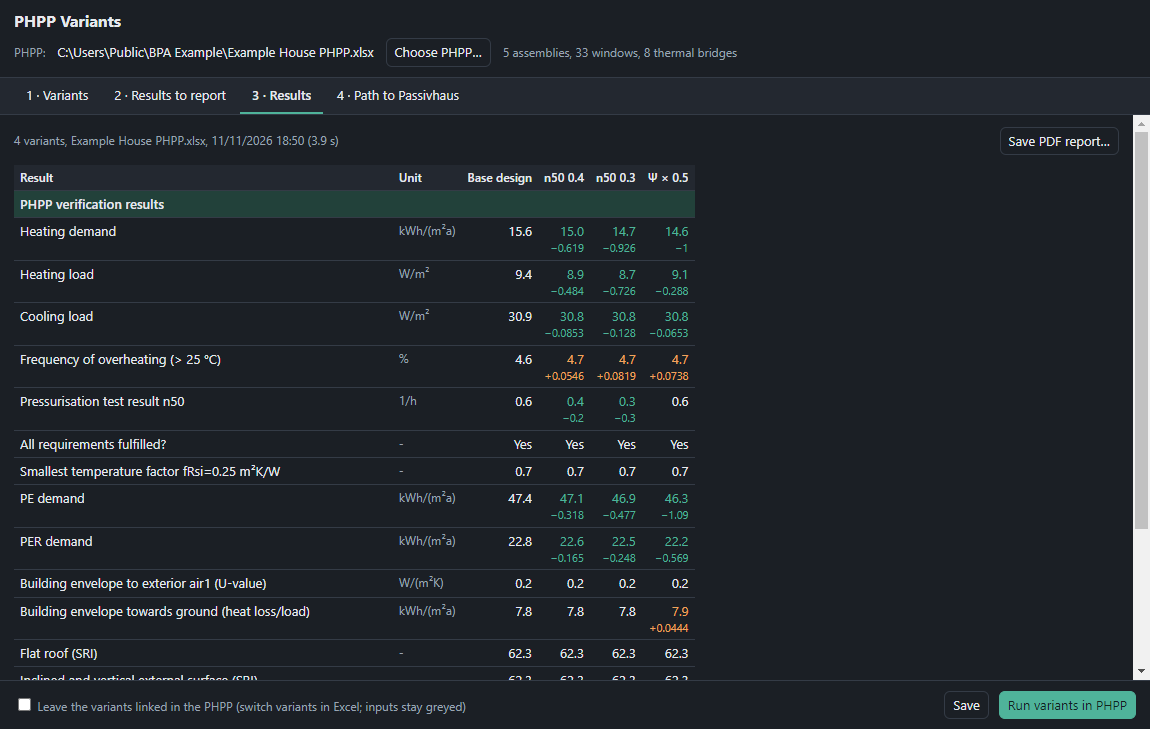
PHPP Variants… compares design options with PHPP's own Variants sheet — no macros. Each column is one full PHPP calculation; a blank cell keeps the PHPP's own value.
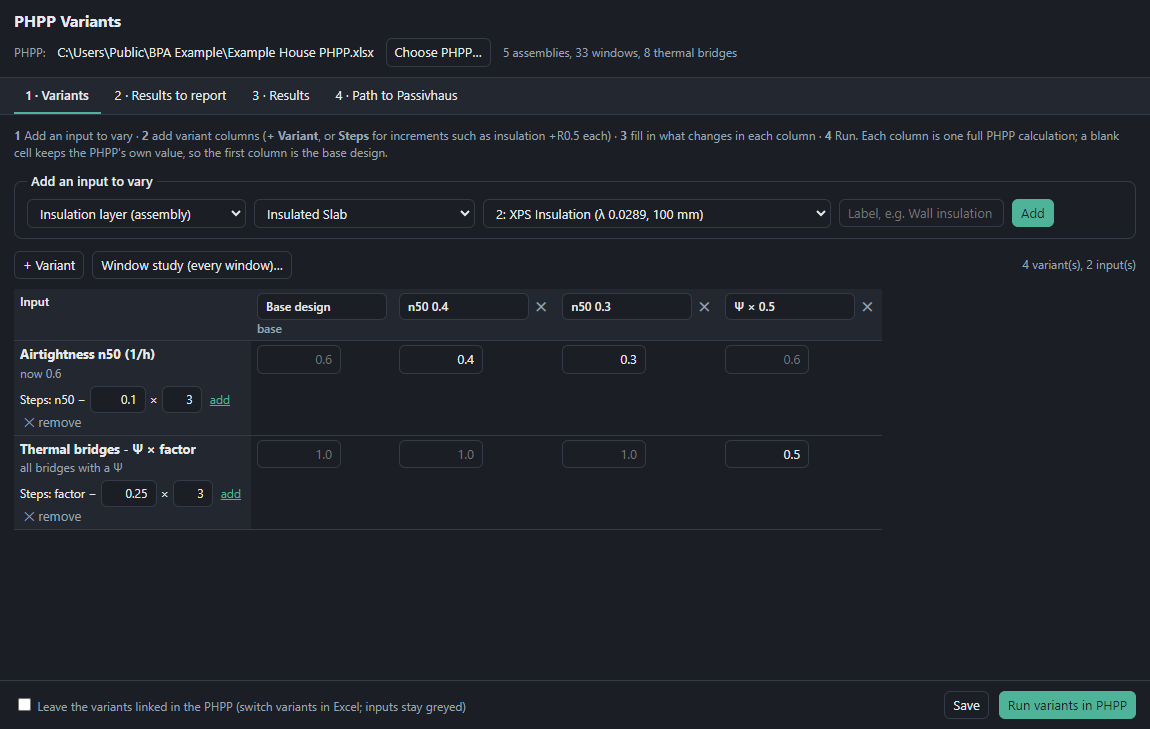
- Add an input to vary: an insulation layer, glazing and frame, windows in or out (to test solar gains), add a window (a copy of one, on another wall or at another size), thermal bridges, airtightness, the ventilation unit, or any other input cell.
- Add variant columns with + Variant, or Steps for increments (insulation +R0.5 each).
- Fill in what changes, then Run variants in PHPP.
Path to Passivhaus (tab 4) finds the fewest and smallest upgrades that make the design meet the Passivhaus criteria. It reads where the heat goes from PHPP's heat balance, tries window options first (frame and glazing ladders), then insulation, thermal bridges and airtightness, keeps what works best each round and steps back anything not needed — then tries temporary sun protection window by window for overheating. The PHPP is left exactly as it was.
12. Evidence for the certifier
- Site Location (Extensions › BPA Tools for designPH › Location PDFs, and the first pages of the Evidence Report): where the model is - SketchUp's geo-location (decimal and degrees/minutes/seconds), altitude, north angle, designPH's climate set and the nearest sets, a street map with the site marked (OpenStreetMap; only the location is sent to fetch it), links that open the site in Google Maps (map or satellite) and OpenStreetMap, and the model from above with north up.
The other location PDFs open from their reports (and from Extensions › BPA Tools for designPH › Location PDFs):
- Thermal bridge locations (PDF)… in the Thermal Bridge Report: every thermal bridge group isolated and labelled on a view of the building.
- Surface locations (PDF)… in the Area Report: the same for every surface in designPH's Areas table.
- TFA locations (PDF)… in the Area Report: every treated floor area surface with its reduction factor, seen from above, with the total against designPH's TFA.
- Volume locations (PDF)… in the Volume Report: every allocated volume, coloured by set (the building left out, the other volumes of its group dashed), with the Vn50 set marked.
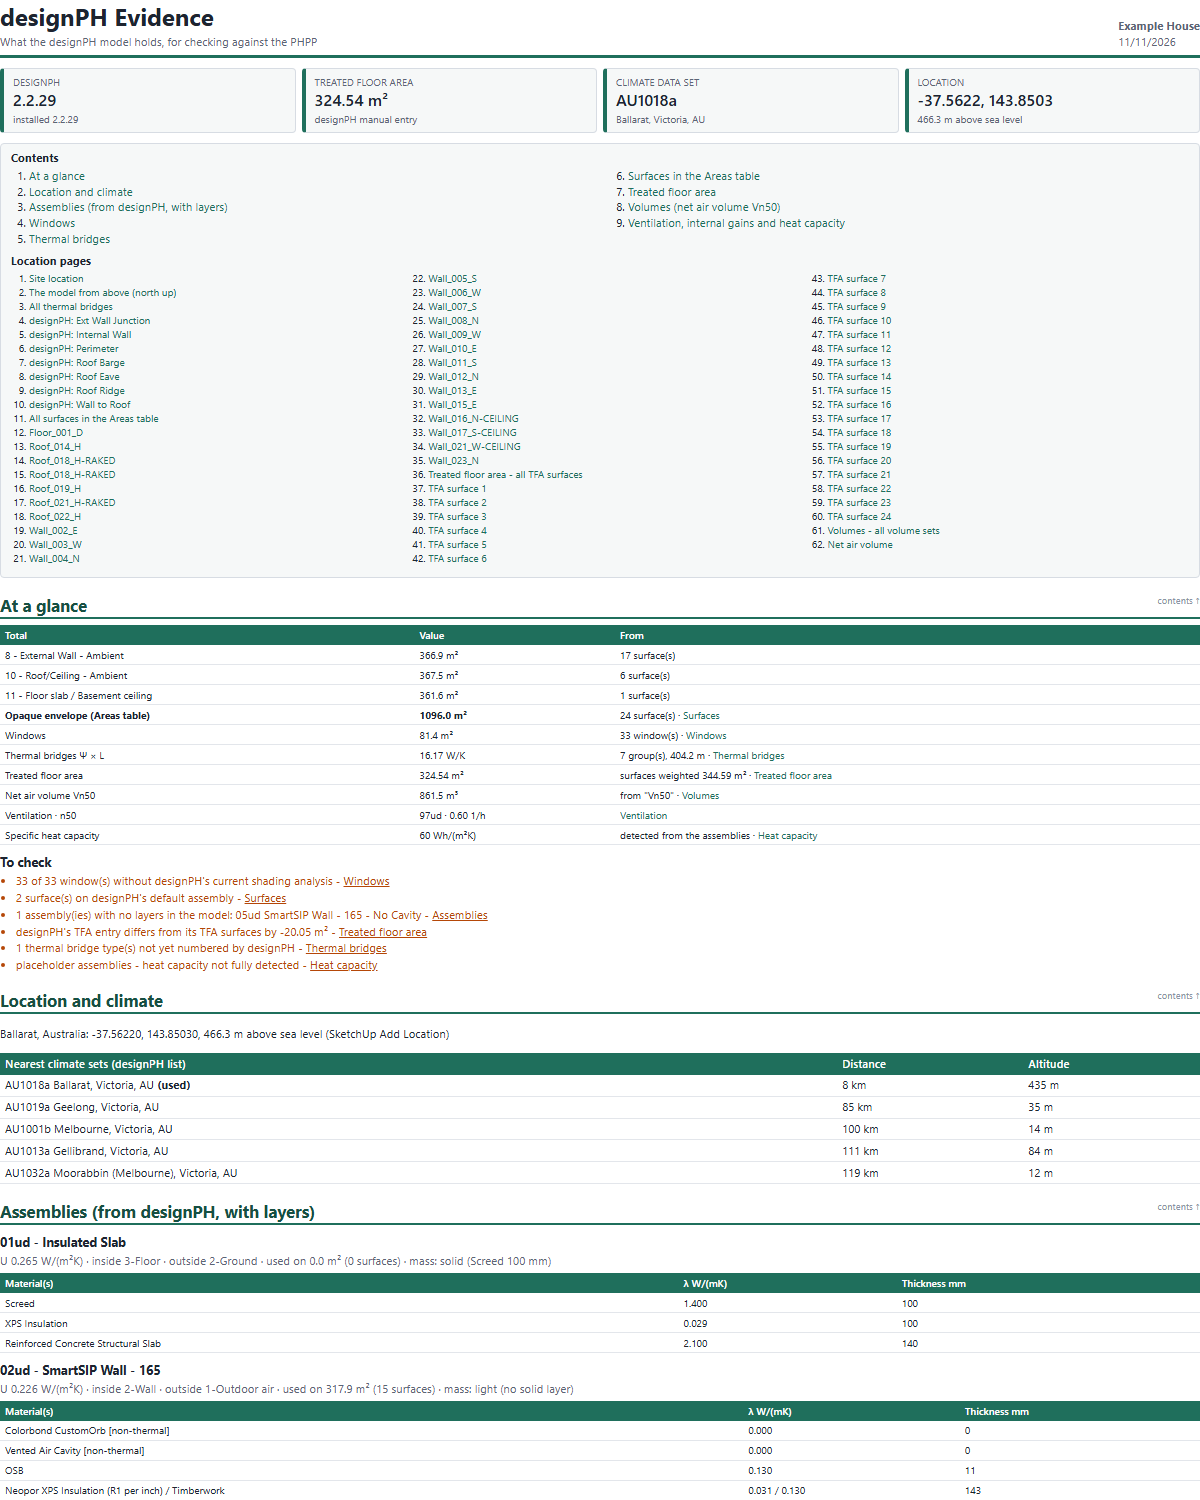
- designPH Evidence Report: an "At a glance" summary with what to check, a contents list, then location and climate, TFA, every assembly with its layers, windows with designPH's shading, thermal bridges, surfaces, the TFA surfaces, the volumes (Vn50) and systems, plus all the location pages — one PDF.
Every button, window by window
The toolbar and the Extensions menu
Every tool is on the BPA Tools for designPH toolbar and in Extensions › BPA Tools for designPH, in groups. The reports: Window Schedule, Window Report, Area Report, Volume Report, Thermal Bridge Report, designPH Evidence Report. Modelling: Allocate to Set…, Labels in Model, Thermal Bridge…. designPH and PHPP: designPH Areas…, designPH Windows…, Import from PHPP…, Library…, PHPP Sync…, PHPP Variants…. Clean-up: Strip to Lines, Strip designPH Properties, Unallocated Surfaces to Non-thermal, Surfaces to Groups…, Analysis Set…, Pause designPH Watching. Then Settings… and Licence…. The menu also has:
- Location PDFs: Site Location, and Thermal Bridge, Surface, TFA and Volume Locations (also a button in each report).
- Unallocated Surfaces Always Non-thermal (this model): a switch. On, every surface you haven't given an area group in designPH is set Non-thermal before each PHPP Sync and each analysis this extension starts - designPH can't be told to stop guessing them into the envelope. It says first how many surfaces designPH currently guesses into the envelope.
- Remove Selection from Sets: takes the selected groups and faces out of their volume or area sets.
- Name Surface…: gives the selected faces your own name, used in the Area Report and the labels.
- Restore designPH Libraries (undo PHPP import): puts designPH's glazing, frames, assemblies and thermal bridge types back exactly as they were before the last Import from PHPP.
- Self-test… (for support): checks this computer's set-up — the PDF browser, the settings folder, the licence server, reading, writing and recalculating a copy of a PHPP you pick (your file is not changed), and window capture — and puts a report on your Desktop to send us.
- Send Support Log…: when a tool fails, the error and where it happened (with the extension, SketchUp and system versions) are noted in a small log - never model content, file contents or client details. This puts a copy on your Desktop and opens an email to gday@buildingphysics.au for you to attach it. (Settings › Support turns the log off.)
Right-click a selection for the same set tools (Add to Volume Set…, Add to Area Set…, Name Surface…, Remove from Sets), Thermal Bridge… for selected edges, and Area Report / Volume Report for just the selection.
Report tables (Window Schedule, Area, Volume and Thermal Bridge Reports)
- Click a column heading to sort by it; click it again to reverse the order.
- Show (Area and Volume Reports): your sets, or only what is selected in the model.
- Filters (orientation, type, frame, glazing, area group…): show only the matching rows; the totals follow what is shown.
- Group by: subtotals for each value of a column.
- Click a row: selects that window, surface, group or bridge in the model.
- Copy: the table as shown, ready to paste into Excel.
- Export CSV: the same as a .csv file, which opens in Excel with the m² and ° signs intact.
- PDF: a clean printed report of the table as shown, with its summary.
- Refresh: reads the model again after you have changed it.
- Window Report… (Window Schedule): the Window Report for the windows shown, in the order shown - designPH screenshots, the PHPP Window Study (flyscreen, shaded, at 50% and deleted) and the PDF, step by step.
- PHPP export (.ppp)… (Thermal Bridge Report): pick designPH's .ppp export and you get a copy for PHPP with your named bridges on top, designPH's own rows moved below (or left out, as you choose) and a sum check.
- ✓ / ✗ TFA (Area Report): whether designPH's TFA entry matches its TFA surfaces. Use the weighted TFA in designPH (shown when they differ, or while ticked): their weighted total becomes designPH's TFA and follows the model; untick to put designPH's own entry back. TFA locations (PDF)…: the TFA Locations report.
- Vn50 (Volume Report): the volume set whose total is the net air volume — designPH's and PHPP's Ventilation M22. PHPP default (M8) puts designPH's own value back (M22 then uses PHPP's reference volume). Room height (with a Vn50 set): Vn50 ÷ TFA as designPH's room height and PHPP Ventilation M7 — an option, usual for non-residential buildings. Vn50 sheet (PDF)…: one page for the airtightness tester. Volume locations (PDF)…: the Volume Locations report.
Capturing designPH's diagrams
- Refresh list: finds designPH's window again, after you open or move it.
- Refresh preview: a fresh picture of designPH's panel to click on.
- Click "Analyse" for me: ticked, the tool clicks designPH's Analyse button for each window; unticked, you click it yourself.
- On the preview, set: Analyse button (click where designPH's button is), Top of capture (click where the useful part of the panel starts), or a report area (drag a rectangle around the shading factors, the shading mask or a radiation chart). Clear areas forgets the rectangles.
- Start steps through the windows; Pause stops straight away (and puts designPH's window back to its size); Capture now captures designPH's panel straight away and moves on; Skip leaves this window out.
- Generate PDF: builds the report from the captures, in window order.
- On a Mac: the first time, allow SketchUp Accessibility and Screen Recording (and restart SketchUp after Screen Recording) — see Setting up on a Mac. An empty window list, or a message naming a permission, means one of them is still off.
Thermal Bridge
- Add to an existing bridge: extend a bridge you made before, or start a new bridge.
- designPH thermal bridge type: one of this model's designPH types, with its Ψ and area group.
- Name and Colour: how the bridge is labelled and coloured in the model and the reports.
- Label it in the model: one label showing the bridge's total length.
- Apply to selected edges: writes the bridge to the selected edges, exactly as designPH stores it.
- Select unallocated edges: in the open group (or the selection), every edge of a designPH envelope surface that isn't a thermal bridge yet - not hidden or soft edges, not seams in one plane - selected, with the count.
designPH Areas
- Tick model selection: ticks the rows of the faces selected in SketchUp.
- Select ticked in model: selects the ticked faces in SketchUp.
- Filter… and Group narrow the list. Set group and/or Set assembly, then Apply to ticked, gives every ticked row that area group or assembly in one go. Click a name to change it. The ticks clear once used, or with Clear ticks.
- Whole area group: pick an area group and an assembly, then Set for the whole group - every surface in that group (external walls, say) gets that assembly.
- Changes stay highlighted until Apply to designPH writes them all (one Undo) or Discard throws them away. Refresh reads the model again.
Library
- Import from a PHPP…: reads your office PHPP's user-defined glazing, frames, assemblies, ventilation units, heat pumps and thermal bridge types, and your usual PHPP Sync settings.
- Add a Library file…: merges a Library somebody else saved; an entry of the same name replaces yours.
- Save a copy…: saves your Library as a file to share with the office.
- The tabs: one per kind of component, plus Usual sync settings. Tick entries; edit a name in place to rename it.
- Delete ticked; Add ticked to designPH (into this model's designPH libraries: free rows only, and thermal bridges match by name); Add ticked to a PHPP… (into a PHPP's user tables, after a backup).
Import from PHPP
- One section per library (Glazing, Frames, Assemblies, Thermal bridges) listing every change it will make; untick a section to leave that library alone.
- From your company Library: tick Library entries to bring in with the same import (all ticks a whole kind). Greyed entries are already in designPH.
- Import ticked: does all of it as one step. Close leaves without changing anything.
PHPP Sync
- Choose PHPP…: the PHPP to write to (a standard PHPP 10).
- Sync (tick box): after one full sync, each new designPH analysis flows into the PHPP while it is open in Excel. Modelling alone doesn't trigger it (on a big model that froze SketchUp) - Sync to PHPP for that.
- Run designPH analysis: runs designPH's own analysis (designPH must be open) so its shading factors are current.
- 1 · Project & systems: climate, building type, occupants, heat capacity (detected from your assemblies, or set by hand), ventilation and heat generators. HP sheet ↗, Boiler sheet ↗ and District heating sheet ↗ show that sheet in Excel.
- 2 · Heating & DHW: the DHW+Distribution sheet (above).
- 3 · Walls & roofs: the radiation inputs for each surface; Areas row ↗ and Areas sheet ↗ show it in Excel.
- 4 · Summer ventilation: the opening type of each window (click an icon on a row, or one for all windows) and the summer ventilation settings.
- 5 · Details & photo: the parties on PHPP's Verification sheet. Paste address splits one line into the fields; Same as building; Save to contacts and Remove from contacts; Clear. Save my company (energy consultancy) keeps it for every new project; everyone else is this project's - type them in, or pick them from Saved contacts…. Verification sign-off: Designer or Certifier, first name, surname, certificate ID, date and city at the foot of the Verification sheet (saved with your company, all but the date). Then the model picture.
- 6 · Preview & sync: Preview changes lists every cell that will change, and the PHPP values that are kept although your settings differ (the PHPP decides everything but the geometry); Sync to PHPP writes them (a backup first, yellow input cells only). Add them to my Library appears when the PHPP has components your Library does not.
- Make my defaults: this model's settings become the start for new models. Save settings keeps them with this model. Refresh reads the model again.
PHPP Variants
- Choose PHPP…: the PHPP to calculate with.
- 1 · Variants: Add an input to vary (pick the kind, then Add). + Variant adds a column; Steps … add adds several columns in even steps; ✕ removes a variant column and ✕ remove an input.
- 2 · Results to report: PHPP's verification results, or any results you pick, plus cells of your own.
- 3 · Results: every variant against the base design; Save PDF report….
- 4 · Path to Passivhaus: tick what may be upgraded and by how much, then Find the path to Passivhaus; Save PDF report… saves the path.
- Leave the variants linked in the PHPP: keeps them in PHPP's Variants sheet, to switch in Excel.
- Save keeps the set-up with the model; Run variants in PHPP calculates every column.
Settings
- The sections down the left (designPH shading, Your company, Reports, PHPP, Path to Passivhaus, Certifier capture, Licence); one Save keeps all of them.
- Apply now: sets designPH's shading analysis straight away. Choose… and Use the model's folder: where reports are offered first. Clear: forgets your PHPP Sync defaults. Back to the built-in defaults: resets the Path to Passivhaus options. Reset capture calibration: forgets the Window Report capture's saved button and areas. Licence…: opens the Licence window.
Licence
- Activate on this computer: with your licence key.
- Check now: asks the licence server straight away (a roaming key takes a free seat).
- Move to another computer… (with a roaming key, Free this seat now): releases this computer.
- Start the trial: 3 days and 3 PDF reports, once per computer.
- Buy or renew a licence…: opens the buy page.
Good to know
- Nothing here changes designPH's own files. Edits to the model (allocations, thermal bridges, names) are ordinary SketchUp operations — Undo reverses them.
- PHPP is opened in a hidden Excel when it is not already open, and closed again; if you have it open, your copy is used (save it afterwards).
- Your settings, Library and licence are in
%APPDATA%\BPA Tools for designPH. - Something not right? Email gday@buildingphysics.au (or reply to your licence email) with what you did and what happened.